Making Selections : Selecting Track Material
 
Selecting Track Material
 
Selections in Multiple Tracks
Selecting Clips
Clips List Selection Follows Edit Selection
Selecting All from Timebase Rulers
Making Selections While Playing
Changing a Selection Length
Nudging a Selection Range
Nudging Selection Start/End Points
Extending Selections
Using the Edit Selection Indicators (Start, End, and Length)
Moving and Extending Selections Between Tracks
Other Useful Selection Techniques
Right-Click Commands and Selection Preservation
Tabbing to Transients
Before audio and MIDI material can be edited, it must first be selected. The Track View determines how the material is viewed and selected.
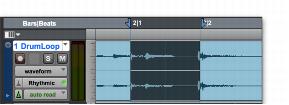
When you make a selection, it appears as a highlighted area of the tracks, and is also indicated by blue start and end arrows (Timeline Selection Markers) in the Main Timebase ruler. If any track (audio or MIDI) in the project is record-enabled, even if it is hidden, these markers appear red.
Timeline Selection Markers indicating Edit selection