Basic Recording Steps
Recording an Audio Track
To record an audio track:
2. From the track’s Output Path selector, select the main monitoring path.
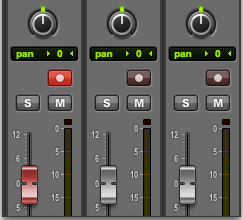
3. Click the Record Enable button for the audio track. It lights red.
Record enabling a track in the Mix window
4. Adjust the output level of your sound source (instrument, mixer, or preamp). Monitor the track’s meter levels in Pro Tools to ensure that levels peak within at least –6 dB to –12 dB on the input meter without triggering the clipping indicator on your audio interface.
5. Do one of the following:

In the Mix window, adjust the track’s volume and pan faders for monitoring. These settings are for monitoring purposes only and do not affect the recorded material.
In the Output window for the track, adjust the track’s Volume fader and Pan sliders for monitoring. These settings are for monitoring purposes only and do not affect the recorded material. (See
“Output Windows for Tracks and Sends” on page 770).
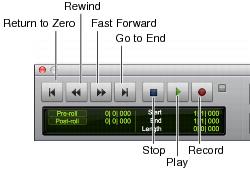
6. Choose Window > Transport to display the Transport window.
Transport window
7. Click Record in the Transport to arm Pro Tools | First for recording. The Record button flashes red to indicate that Pro Tools | First is ready to record.
9. When you are ready to start recording, click Play or press the Spacebar.
If using Countoff, Pro Tools counts off the specified number of measures and then begins recording. See
“Recording with a Click” on page 223.
10. Record your performance.
11. Click Stop in the Transport or press the Spacebar when you are finished recording.
The newly recorded audio is written to disk and appears as an audio clip both in the track and in the Clips List.