Example Elastic Audio Workflow
In this workflow, you will be introduced to some common Elastic Audio tasks for working with loops:
• Create and configure a new project for this workflow.
• Locate and preview a loop in a Workspace browser at the project tempo.
• Import the loop at the project tempo on a tick-based, Elastic Audio-enabled track.
• Change the project tempo to change the tempo of the clip on tick-based, Elastic Audio-enabled tracks.
• Quantize the audio to apply a Groove Template to the rhythm.
• Transposition the clip to match the pitch of the imported audio to other audio and MIDI in the project.
Create and configure a new project
1. Create a new project.
2. Set the project’s Main Timebase ruler to Bars|Beats.
3. Use the default tempo of quarter-note equals 120 BPM.
Locate and preview a loop in a Workspace browser at the project tempo:
1. Open the Workspace (Window > Workspace).
2. Navigate to the folder where you keep your drum loops. Double-click the folder name to open a browser window showing just the folder’s contents.
3. Select the loop you want to preview.
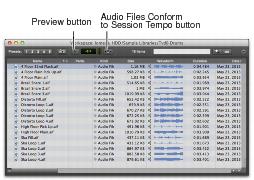
4. Click the Preview button to preview the loop at its native tempo.
Preview and Audio Files Conform to Session Tempo buttons in a Workspace browser
5. Click the Audio Files Conform to Session Tempo button so that it highlights.
6. Click the Preview button again and the file previews at the project tempo.
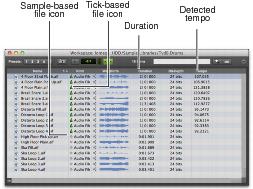
7. Notice that if the loop was sample-based to begin with, once it is analyzed the file’s Duration is now measured in Bars and Beats instead of Minutes and Seconds, the Sample-based icon is replaced by the Tick-based icon, and the detected tempo of the file is displayed in the Tempo column.
Elastic Audio controls and indicators in the Workspace
8. Repeat the preceding steps to preview other loops at the project tempo.
Import the loop at the project tempo:
1. Make sure that the Audio Files Conform to Session Tempo button is still highlighted. This ensures that the file will be imported as a tick-based, Elastic Audio clip and can be conformed to the project tempo.
2. Drag and drop the loop from the browser to blank space in the Edit window.
3. One of the following occurs:

If there are no tracks in the project and the file is tick-based, you are prompted to either import the tempo from the file or use the project tempo. To keep the project tempo and have the loop conform to the project tempo, click
Don’t Import.
If there are tracks in the project, the file is imported and automatically conformed to the project tempo.
4. A new tick-based audio track is created with the Polyphonic Elastic Audio plug-in enabled.
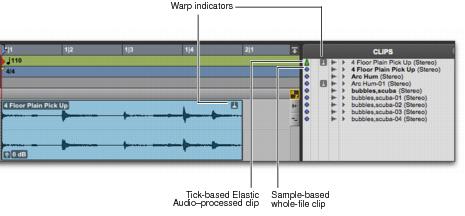
5. Since you chose to not import the file’s original tempo, you will notice that the loop conforms to the tempo map and Bar|Beat grid of the project. A Warp indicator appears in both the clip in the track and in the Clips List.
Also in the Clips List, notice that there are two clips. One is the sample-based whole file clip (the imported source file) and the other is the tick-based Elastic Audio–processed copy.

You can also conform clips on Elastic Audio-enabled tracks to the project tempo using the Conform to Tempo command (see “Conform to Tempo” on page 742).
Imported tick-based audio file with Elastic Audio processing
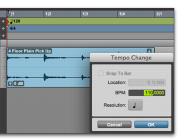
Change the project tempo to change the tempo of the clip:
Changing the default tempo
2. Notice that since the clip is on a tick-based, Real-Time Elastic Audio-enabled track it automatically conforms to the new tempo.
Quantize audio to apply a Groove Template:
1. Select the clip on the tick-based, Real-Time Elastic Audio-enabled track.
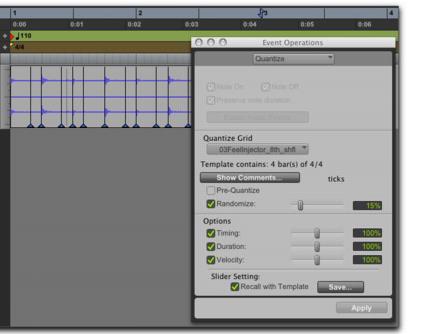
2. Choose Event > Event Operations > Quantize.
3. In the What to Quantize section, make sure Elastic Audio Events option is selected.
4. From the Quantize Grid pop-up menu, select a Groove Template.
5. Set any other options.
6. Click Apply.
7. In the following figure, notice that the audio has been quantized according to the selected Groove Template. In Warp view, you can see that Warp markers have been added at every Event marker near the Quantize Grid and were used to apply quantization to those events.
Quantized audio events (Warp markers) in Warp view
Transpose the audio clip down a whole-tone:
1. Select the clip on the Elastic Audio-enabled track.
2. Choose Event > Event Operations > Transpose.
3. Select the Transpose By option.
4. Enter “–2” semitones.
5. Click Apply.